Photographing The Eye
Digital Photography
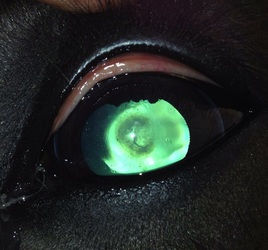
Modern digital cameras allow excellent quality macro photography with little practice or financial outlay. The use of flash allows critical evaluation of structures posterior to the pupil as well as the use of retro-illumination to highlight subtle corneal lesions. The high resolution now readily available allows magnified views equivalent to that obtained with high end slit lamps with the added advantage that the patient only has to stay still for the few seconds required to focus and take the image.
Telemedicine
We are always happy to view images without any obligation (as are many ophthalmologists). Email us: eyes@equineeyeclinic.co.uk (it's worth ringing us (01453 844337) to say you will be sending images in case our spam filter is one of its over zealous moods) and definitely if the query is urgent. It also allows sequential record keeping – "is this stromal abscess getting smaller?", "is this catarct getting bigger?". It’s amazing how much more information you can get studying a still image on a screen – sometimes we don't see the wood for the trees.
Which Camera?
Digital SLRs:
Advantages
o Rapid focussing
o Minimal delay between shots
o Burst mode useful for moving patients
o Good quality lenses improve image quality
o Availability of dedicated macro lenses
o Standard macro capability of most included lenses often sufficient
Disadvantages
o Cost, size and fragility
o Built in flashes further from cameras “visual axis” thus often require more distant position to obtain good tapetal reflex
Compact digital cameras:
Advantages
o Cost, often more robust, pocket sized.
o Flash often much closer to optical axis allowing macro photography with tapetal reflection
o Ease of use
Disadvantage
o Slow to focus, slow to ready for next shot – however newer compacts better than ever before.
o Some noisy to focus which can reduce compliance when used at closest position
o Not all have ability to select spot focus
Camera phones:
Advantages
o Always with you
o Increasingly impressive camera technologies
o Allows rapid telemedicine referrals
o Flash often very close to lens and therefore allows use as a direct ophthalmoscope where able to have camera LED continuously illuminated allowing distant direct views and close direct fundic views.
o Video function often readily available
o Accessible for owners for use in monitoring where appropriate
Disadvantage
o Macro photography may be limited without use of additional lenses
o LEDs often very bright requiring adjunctive methods to reduce illumination intensity.
Shopping list (for all cameras):
o Macro setting
o P (programme) setting – allows more control over cameras functions
o Spot or centre focussing selectable
o Force flash always on
o Disable red eye reduction facility
o Rapid, quiet focussing
o Shortest delay between photo’s
o Burst mode useful on digital SLRs (rarely fast enough on compacts to be of use.
o Good quality memory card with rapid write speed.
o Long battery life and / or option to use readily available batteries (eg AA)
Tips for taking ophthalmic photographs: " Flash, Flower and Focus
"Flash"
o Force flash always on, turn red eye reduction off.
"Flower"
o Macro setting on
o Zoom off (select widest angle lens allows)
"Focus"
o Allow camera to focus lock before photograph taken, usually half depress button and wait until an audible signal or focussing grid or spot changes colour to confirm focussed.
o Practice- ensure comfortable with minimum focus distance by using e.g. text
o Spot or centre focussing selected (without cameras tend to focus on the prominent equine eye lashes)
o If autofocus focuses on corneal reflection then focus at lateral canthus, obtain focus lock before moving back to axial view of the eye to obtain focus at level of iris.
Other tips
o Try and reduce shutter speed to minimum by increasing ISO although note at some very high ISO settings image quality may reduce. This is rarely required if flash on.
o Clean discharge and remove hairs from cornea.
o Avoid holding lids open if possible as will obtain corneal reflection of hand and distort lid anatomy.
o Avoid wearing white or red clothes as these will often cause striking corneal reflections.
o Take standard views for all patients :
-
Whole face – aim to get both tapetal reflections
-
Whole eye, straight on– aim to fill screen with eye if macro allows, aim to get tapetal reflection – talk to patient just before take picture.
-
Whole eye, lateral view – aim to skyline corneal curvature and anterior chamber.
-
Lid anatomy (where relevant)
-
Eyes open
-
Eyes closed – induced blink
-
Lid margins everted if pathology
-
Third eye lid prolapsed
Fundus photography

Fundus photographs are possible using a compact or DLR with an indirect lens, practice, patience and a dilated pupil. A light source can be secured to the lens of a digital SLR (e.g. pen torch and rubber band) or with a compact a head torch can aid in correct positioning.

Some smart phone cameras lend themselves to fundic photography e.g. iPhone4S
Check out www.theeyephone.co.uk for more information on using the smart phone to image the eye.


